Friday, September 8, 2017
Due to Hurricane Irma...
Hello all! Some of you may or not know that I live in Florida, which currently Florida is in the direct path of Hurricane Irma, not to mention there is another very powerful hurricane (Hurricane Jose) just behind that. My family and I have prepared the best we can for this catastrophic storm (plus possibly a second hurricane) and now all we can do is pray that we as well as all those in its path will be safe. Due to the hurricane I wanted to make a post to address the giveaway I was having for the 30 Days of Diemond Dies, which I was to announce a winner on September 11th. Unfortunately, no one even entered my giveaway, so sadly there is no winner to announce :( I was very much hoping to award a package of Diemond Dies and other goodies to someone in my giveaway, but with no entries, I will instead be passing on the prize pack to a very special crafty lady that recently did a very generous thing for someone she didn't even know... me :) I will hold another giveaway in the future though. For all those reading this that live in Florida or whom are in the path of Hurricane Irma, I send you all my thoughts and prayers. I as well continue to pray for all those affected by the hurricane that hit Texas just recently. Thank you for stopping by today and happy crafting!
Monday, August 28, 2017
30 Days of Diemond Dies Project #3
Happy Monday to you all! I am back to share my third 30 Days of Diemond Dies Guest Design Team Project! For my project today I used the Diemond Dies Fluttering Butterfly Die Set
and the Die-Normous Stack-Ems Nesting Scalloped Circles Die Set. I just
wanted to point out how fabulous the dies are from Diemond Dies. The
technique I used today consisted of several layers needing to be die cut
all at once and these dies cut through them all in one pass like
butter. They truly are amazing dies!
I wanted to remind you all that 30 Days of Diemond Dies will be coming to an end soon so be sure to take advantage of the prize drawings and discount. To enter the 30 Days of Diemond Dies prize drawings head over to the Diemond Dies Facebook page (click here to go directly to Diemond Dies Facebook or use link below), once there "like" their Facebook page then "like" and comment on each of the 30 Days of Diemond Dies daily posts. To take advantage of the discount head to www.diemonddies.com use the discount code ddcc to receive 20% off and free worldwide shipping on orders of $20 or more.

I wanted to remind you all that 30 Days of Diemond Dies will be coming to an end soon so be sure to take advantage of the prize drawings and discount. To enter the 30 Days of Diemond Dies prize drawings head over to the Diemond Dies Facebook page (click here to go directly to Diemond Dies Facebook or use link below), once there "like" their Facebook page then "like" and comment on each of the 30 Days of Diemond Dies daily posts. To take advantage of the discount head to www.diemonddies.com use the discount code ddcc to receive 20% off and free worldwide shipping on orders of $20 or more.
The time to enter my giveaway is narrowing down too. To enter my giveaway all I ask is that you leave a comment on all 3 of my 30 Days of Diemond Dies
blog posts and also go like my Facebook page (the link is provided below or you can just click here to be taken directly to my Facebook page. The dates for my 3 project posts are as follows: August 6th,
August 17th, and today August 28th so be sure to comment on these posts) I will be giving away some of the products featured in my
30 Days of Diemond Dies posts plus some
other special goodies. This is just my way of passing on the generosity that Dee, the owner of Diemond Dies, has shown to me. I
will be announcing the winner on September 11th. (P.S. - I will be
verifying you've met all my giveaway requirements
so be sure you
follow my instructions in order to be entered).
O.k. now that we have all that covered lets get onto the details of today's project.

 |
| An angled view to show the glitter sparkle better |
To make today's project I started by selecting fine glitters in different colors. These glitters can be purchased almost anywhere from craft stores, big box stores, to even the dollar stores. I chose four colors in total. All four of my colors came from the Recollections brand. Then I covered one side of plain Georgia White Cardstock with Sookwang Tape, do not remove the adhesive cover. On the side that has the tape face up, I placed the largest die from the Diemond Dies Ems Scalloped Circle Die Set along with the two butterflies from the Diemond Dies Fluttering Butterfly Die Set and ran them through my cutting machine. I then removed the scalloped circle die completely but positioned the butterflies in new spots until the entire surface had butterfly cuts. I as well ran a smaller piece of white cardstock, again with the Sookwang Tape covering it, plus the two butterfly dies through my die cutting machine. This gave me the base to make the two additional butterflies seen floating on the card. I cut an additional scalloped circle separately which will be used to make the inside/back of the card.
Once I had all my pieces, I gently took a pointed tool and began removing the adhesive covering off the tape but only removing the covering on the areas I wanted to cover with one specific glitter color. Once the covering was removed I poured glitter over the tape and rubbed the glitter in making sure the tape was covered. I brushed off all the glitter that did not stick and replaced it back into the container. A Swiffer sheet helps to clean up and remove any excess glitter. What's great is that you can reuse these Swiffer sheets and since you only need a small portion of the sheet, a small box can last you for years. You will repeat this process for each color and will do this technique for wherever you want glitter to cover your paper and as well do the technique on the two butterflies that will be floating. Here is a link to a video where Jennifer McGuire uses this same technique but with embossing powder instead of glitter https://www.youtube.com/watch?v=4kOjlkWqIVY
You may notice in my peach glitter background that there are lines. I did this intentionally because I wanted to give it more dimension. I was able to do this by using strips of Sookwang tape and putting a very slight gap between each row of tape. If you do not wish to have the lines then you will simply make sure there is no space/gaps between the rows of tape or you can use a solid sheet of Sookwang tape instead.
Lastly I scored the piece of the round plain scalloped cardstock at 1/2" down from the top. Place Sookwang tape or any other adhesive above the score line. Attach it to the back of your designed glitter piece and Viola you have a full card. To put finishing touches on my card, I randomly placed Doodle Bug Glitter Dots on the front and glue my floating glitter butterflies on top. (place glue just on the body of the butterflies then once dry pull up on the wings to get the floating effect) Ta Da I'm all done ;) Thank you so much again for joining me today! I wish you all a beautiful day!
Supplies:
Diemond Dies - Fluttering Butterfly Die Set (*DTMB)
Diemond Dies - Die-Normous Stack-Ems Nesting Scalloped Circles Die Set (*DTMB)
Georgia Pacific White Cardstock
Multi Matte Medium .5oz
Multi Matte Medium 4oz
Scor-Pal/Scor-Tape/Sookwang Tape
Crafter's Companion - Extra Strong Permanent Tape Runner
EK SuccessPrecision Tip Tweezers
American Crafts/Cut Up 9" Paper Trimmer
Matha Stewart - Scoring Board Tool
Foldio 2 Portable Photo Studio
Sizzix Big Shot Machine
Sizzix Magnetic Platform
Clear Plate Holder (to hold my card - can be found at Michael's Crafts)
The Stamps of Life - Custom Made Personalized Stamp (used to stamp very back of card)
Fine Glitter (as many colors you choose)
Doodle Bug Glitter Dots
Instagram: @atvbumpkin
Twitter: @atvbumpkin
Pintrest: @atvbumpkin
YouTube: https://www.youtube.com/user/
Diemond Dies Links & Info:
Diemond Dies Facebook: https://www.facebook.com/Diemond-Dies-405160769595096/
Diemond Dies store: www.diemonddies.com
Diemond Dies YouTube Channel
Use code ddcc to receive 20% off and free worldwide shipping on orders of $20 or more when you shop at www.diemonddies.com
(Disclaimer: Any supply links listed above are links solely being
used as a
guide to show you what those items are. Some links may come directly
from the manufacturer while others may not. Unless otherwise stated all
products were purchased by me with my own money and in no way am I
affiliated
with these links nor the businesses associated
with them, meaning I receive no compensation for sharing these products
with you. I simply share these products because I personally enjoy using
them and think you might too. Products provided to me as part of my
Design Team Member
benefits will be marked with a *DTMB. Please use your discretion should
you
choose to shop from the
links listed above. Thank you.)
#30daysofdiemonddies #diemonddies
#30daysofdiemonddies #diemonddies
Thursday, August 17, 2017
30 Days of Diemond Dies Project #2
Happy Thursday Everyone! I am back today to share my second 30 Days of
Diemond Dies Guest Design Team Project with you! Before we get to my project though I wanted to remind you about the 30 Days of Diemond Dies. During the 30 Days of Diemond Dies myself along with many other Design Team members and Guest Designers will be showcasing projects featuring products from Diemond Dies. Diemond Dies will be having giveaways as well as discounts when you shop their online store. So when you're finished viewing my project be sure you head over to the Diemond Dies Facebook page (click here to go directly to Diemond Dies Facebook or use link below), once there like and comment on each of the 30 Days of Diemond Dies
daily posts, that way you will be entered into all the fabulous
giveaway drawings!
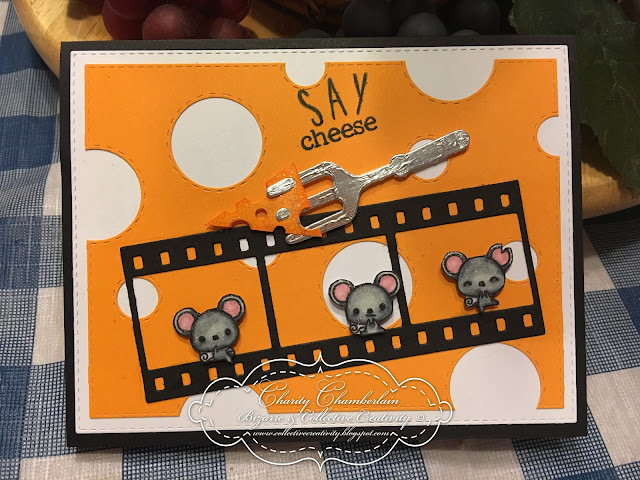
For today's project I made this super cute card. My card base is an A2 card which measures 4.25" x 5.5". To get this measurement simply cut a piece of 8.5" x 11" cardstock in half (this will actually give you two A2 card bases). Score the cardstock at 4.25" then fold at the scoreline. I used Recollections Black Cardstock for my base. I then used the More Stitched Rectangular Dies and Stitched Rectangular Frame Dies & More from My Creative Time to cut White Georgia Pacific Cardstock as well as Recollections Orange Cardstock to add layers and dimension to my card. I wanted the orange cardstock layer to look like a piece of cheese so in order to do that I used the More Stitched Circle Dies from My Creative Time to cut circles as well as half circles into the cardstock. I hand cut a triangle from the orange cardstock then used two different sized hole punches to make it look like cheese (this is the cheese on the fork). For the "fork" I used the Diemond Dies Garden Tools Die Set to cut a piece of aluminum foil. I then cut the film strip using the Diemond Dies Filmstrip die. I cut that from the same Recollections Black Cardstock. Those adorable little mice came from a Mama Elephant stamp set called Tandem Ride. I stamped them with Memento Tuxedo Black Ink then colored them with Copic color RV32, R81 (inside ears) and Spectrum Noir alchohol markers colors IG2, IG4, IG6 (body). Lastly I added Wink of Stella Clear Glitter Pen to make them cuties sparkle. Oh, the sentiment "Say Cheese" was stamped using an alphabet stamp set and I also used some Distress Inks to certain parts of the cardstock. To adhere the entire card together I used a combination of glues and double sided tapes.
Well that wraps up my project for today :) Thank you so much for joining me and remember to come back August 28th!
Supplies:
Diemond Dies - Filmstrip Die (*DTMB)
Diemond Dies - Garden Tools Die Set (*DTMB)
My Creative Time - More Stitched Rectangular Dies
My Creative Time - Stitched Rectangular Frame Dies & More
My Creative Time - More Stitched Circle Dies
Georgia Pacific White Cardstock
Recollections Cardstock - Black
Recollections Cardstock - Orange
Distress Inks
Ranger Mini Round Ink Blending Tool Foam Refills
Spectrum Noir Alcohol Markers - IG2, IG4, IG6
Copic Alcohol Markers - RV32, R81
Memento Tuxedo Black Ink Pad
White Jelly Roll Pen (to add white highlights/detail)
Black Jelly Roll Pen (to add black detail)
Copic Multiliner Pens (to add black detail in areas where alcohol markers are used)
Wink of Stella - Clear
Multi Matte Medium .5oz
Multi Matte Medium 4oz
Scor-Pal/Scor-Tape/Sookwang Tape
Crafter's Companion - Extra Strong Permanent Tape Runner
EK SuccessPrecision Tip Tweezers
American Crafts/Cut Up 9" Paper Trimmer
Matha Stewart - Scoring Board Tool
Foldio 2 Portable Photo Studio
Sizzix Big Shot Machine
Sizzix Magnetic Platform
Clear Plate Holder (to hold my card - can be found at Michael's Crafts)
The Stamps of Life - Custom Made Personalized Stamp (used to stamp very back of card)
My Social Media:
Instagram: @atvbumpkin
Twitter: @atvbumpkin
Pintrest: @atvbumpkin
YouTube: https://www.youtube.com/user/
Diemond Dies Links & Info:
Diemond Dies Facebook: https://www.facebook.com/Diemond-Dies-405160769595096/
Diemond Dies store: www.diemonddies.com
Diemond Dies YouTube Channel
Use code ddcc to receive 20% off and free worldwide shipping on orders of $20 or more when you shop at www.diemonddies.com
(Disclaimer: Any supply links listed above are links solely being used as a guide to show you what those items are. Some links may come directly from the manufacturer while others may not. Unless otherwise stated all products were purchased by me with my own money and in no way am I affiliated with these links nor the businesses associated with them, meaning I receive no compensation for sharing these products with you. I simply share these products because I personally enjoy using them and think you might too. Products provided to me as part of my Design Team Member benefits will be marked with a *DTMB. Please use your discretion should you choose to shop from the links listed above. Thank you.)
#30daysofdiemonddies #diemonddies
In addition to the amazing giveaways being held on the Diemond Dies Facebook page, Dee (the owner of Diemond Dies) has
graciously passed along a discount code for you to receive 20% off and
free worldwide shipping on orders of $20 or more when you shop at www.diemonddies.com The discount code you will need to use when making your
purchase is ddcc
Plus I too will be having a giveaway right here on my blog. Dee's generosity made me want to share in her kindness too so I will be
passing along some of the Diemond Dies products that I feature in my projects plus some
other special goodies. To enter my giveaway you will need to
leave a comment on all 3 of my 30 Days of Diemond Dies
blog posts and also go like my Facebook page (the link is provided below or you can just click here to be taken directly to my Facebook page).
The dates for my 3 project posts are as follows: August 6th,
August 17th, and August 28th. Since this is 30 Days of Diemond Dies I
will not be announcing a winner until September 11th that way everyone
will have enough time to enter all 3 blog posts. (P.S. - I will be verifying you've met all my giveaway instructions prior to the drawing so be sure you
follow my instructions in order to be entered).
All righty then, since we have all the details explained, lets get onto today's project.

For today's project I made this super cute card. My card base is an A2 card which measures 4.25" x 5.5". To get this measurement simply cut a piece of 8.5" x 11" cardstock in half (this will actually give you two A2 card bases). Score the cardstock at 4.25" then fold at the scoreline. I used Recollections Black Cardstock for my base. I then used the More Stitched Rectangular Dies and Stitched Rectangular Frame Dies & More from My Creative Time to cut White Georgia Pacific Cardstock as well as Recollections Orange Cardstock to add layers and dimension to my card. I wanted the orange cardstock layer to look like a piece of cheese so in order to do that I used the More Stitched Circle Dies from My Creative Time to cut circles as well as half circles into the cardstock. I hand cut a triangle from the orange cardstock then used two different sized hole punches to make it look like cheese (this is the cheese on the fork). For the "fork" I used the Diemond Dies Garden Tools Die Set to cut a piece of aluminum foil. I then cut the film strip using the Diemond Dies Filmstrip die. I cut that from the same Recollections Black Cardstock. Those adorable little mice came from a Mama Elephant stamp set called Tandem Ride. I stamped them with Memento Tuxedo Black Ink then colored them with Copic color RV32, R81 (inside ears) and Spectrum Noir alchohol markers colors IG2, IG4, IG6 (body). Lastly I added Wink of Stella Clear Glitter Pen to make them cuties sparkle. Oh, the sentiment "Say Cheese" was stamped using an alphabet stamp set and I also used some Distress Inks to certain parts of the cardstock. To adhere the entire card together I used a combination of glues and double sided tapes.
Well that wraps up my project for today :) Thank you so much for joining me and remember to come back August 28th!
Supplies:
Diemond Dies - Filmstrip Die (*DTMB)
Diemond Dies - Garden Tools Die Set (*DTMB)
My Creative Time - More Stitched Rectangular Dies
My Creative Time - Stitched Rectangular Frame Dies & More
My Creative Time - More Stitched Circle Dies
Georgia Pacific White Cardstock
Recollections Cardstock - Black
Recollections Cardstock - Orange
Distress Inks
Ranger Mini Round Ink Blending Tool Foam Refills
Spectrum Noir Alcohol Markers - IG2, IG4, IG6
Copic Alcohol Markers - RV32, R81
Memento Tuxedo Black Ink Pad
White Jelly Roll Pen (to add white highlights/detail)
Black Jelly Roll Pen (to add black detail)
Copic Multiliner Pens (to add black detail in areas where alcohol markers are used)
Wink of Stella - Clear
Multi Matte Medium .5oz
Multi Matte Medium 4oz
Scor-Pal/Scor-Tape/Sookwang Tape
Crafter's Companion - Extra Strong Permanent Tape Runner
EK SuccessPrecision Tip Tweezers
American Crafts/Cut Up 9" Paper Trimmer
Matha Stewart - Scoring Board Tool
Foldio 2 Portable Photo Studio
Sizzix Big Shot Machine
Sizzix Magnetic Platform
Clear Plate Holder (to hold my card - can be found at Michael's Crafts)
The Stamps of Life - Custom Made Personalized Stamp (used to stamp very back of card)
My Social Media:
Instagram: @atvbumpkin
Twitter: @atvbumpkin
Pintrest: @atvbumpkin
YouTube: https://www.youtube.com/user/
Diemond Dies Links & Info:
Diemond Dies Facebook: https://www.facebook.com/Diemond-Dies-405160769595096/
Diemond Dies store: www.diemonddies.com
Diemond Dies YouTube Channel
Use code ddcc to receive 20% off and free worldwide shipping on orders of $20 or more when you shop at www.diemonddies.com
(Disclaimer: Any supply links listed above are links solely being used as a guide to show you what those items are. Some links may come directly from the manufacturer while others may not. Unless otherwise stated all products were purchased by me with my own money and in no way am I affiliated with these links nor the businesses associated with them, meaning I receive no compensation for sharing these products with you. I simply share these products because I personally enjoy using them and think you might too. Products provided to me as part of my Design Team Member benefits will be marked with a *DTMB. Please use your discretion should you choose to shop from the links listed above. Thank you.)
#30daysofdiemonddies #diemonddies
Sunday, August 6, 2017
30 Days of Diemond Dies Project #1
Hope you all are having a wonderful weekend! Today I am thrilled to be sharing my first 30 Days of
Diemond Dies Guest Design Team Project with you! After you have finished here on my blog be sure you head
on over to the Diemond Dies Facebook page (click here to go directly to Diemond Dies Facebook or use link below), once there like and comment on each of the 30 Days of Diemond Dies
daily posts, so that way you will be entered into all the fabulous
giveaway drawings!
In addition to the amazing giveaways being held on the Diemond Dies Facebook page, Dee has
graciously passed along a discount code for you to receive 20% off and
free worldwide shipping on orders of $20 or more when you shop at www.diemonddies.com
Awesome right! The discount code you will need to use when making your
purchase is ddcc
I too will be having a giveaway here on my blog. Dee, the owner of Diemond Dies, was very gracious to provide me with dies to use on my projects so I thought I would share the generosity. I will be passing along some of the dies I featured in my projects along with some other goodies I am adding. All you have to do to enter my giveaway is leave a comment here on my blog for all 3 of my 30 Days of Diemond Dies posts and also go like my Facebook page (the link is provided below or you can just click here to be taken directly to my Facebook page).
The dates for my 3 project posts are as follows: August 6th, August 17th, and August 28th. Since this is 30 Days of Diemond Dies I will not be announcing a winner until September 11th that way everyone will have ample time to enter each post. (P.S. - I will be verifying you met all my giveaway instructions prior to the drawing so be sure you follow my instructions in order to be entered)
Whew! Now that I have filled you in on all the details, lets get onto my project and the products I used.

Supplies List:
Diemond Dies - Cross Stitched Square Dies
Diemond Dies - Monkey Buildable Dies
Diemond Dies - Teddy Bear Buildable Dies
Diemond Dies - Fluttering Butterfly Die Set (*DTMB)
Diemond Dies - Pretty Petals Flower Die Set (*DTMB)
Diemond Dies - Watering Can Mini Album Die (*DTMB)
12x12 Lawn Fawn Perfectly Plaid paper
Recollections Dreamy Card stock
Doodle Bug Design Inc - Glitter Sprinkle Dots
Micro Mini Clear Rhinestones
Distress Inks
Ranger Mini Round Ink Blending Tool Foam Refills
GeorgiaPacific White Cardstock
White Jelly Roll Pen (to add white highlights/detail)
Black Jelly Roll Pen (to add black detail)
Wink of Stella - Clear
Multi Matte Medium.5oz
Multi Matte Medium 4oz
Scor-Pal/Scor-Tape/SookwangTape
Crafter's Companion - Extra Strong Permanent Tape Runner
EK SuccessPrecision Tip Tweezers
AmericanCrafts/Cut Up 9" Paper Trimmer
Crafter's Companion - Extra Strong Permanent Tape Runner
EK SuccessPrecision Tip Tweezers
AmericanCrafts/Cut Up 9" Paper Trimmer
Wescott T-Ruler
Martha Stewart - Scoring Board Tool
Martha Stewart - Scoring Board Tool
Sizzix Big Shot Machine
SizzixMagnetic Platform
SizzixMagnetic Platform
Social Media:
Diemond Dies Facebook: https://www.facebook.com/Diemond-Dies-405160769595096/
Instagram: @atvbumpkin
Twitter: @atvbumpkin
Pintrest: @atvbumpkin
YouTube: https://www.youtube.com/user/
(Disclaimer: Any supply links listed above are links solely being used as a guide to show you what those items are. Some links may come directly from the manufacturer while others may not. Unless otherwise stated all products were purchased by me with my own money and in no way am I affiliated with these links nor the businesses associated with them, meaning I receive no compensation for sharing these products with you. I simply share these products because I personally enjoy using them and think you might too. Products provided to me as part of my Design Team Member benefits will be marked with a *DTMB. Please use your discretion should you choose to shop from the links listed above. Thank you.)
#30daysofdiemonddies #diemonddies
Friday, July 28, 2017
30 Days of Diemond Dies starting August 1st
Happy Friday everyone! I just wanted to pop in and give you all a heads up that starting August 1st Diemond Dies will be having their 30 Days of Diemond Dies! Woo Hoo! During the 30 Days of Diemond Dies we will be sharing projects featuring Diemond Dies amazing products! In addition there will be drawings and prizes! But that's not all... If you make a purchase at www.diemonddies.com be sure to use my code ddcc to get 20% off and free shipping worldwide on orders of $20 or more! Isn't that fantastic! So please be sure to join us!
#30DaysofDiemondDies #DiemondDies
#30DaysofDiemondDies #DiemondDies
Thursday, June 22, 2017
I've Missed You All!
My-oh-my how I've missed you all! My sincere apologies for not being around in a while as it has been almost a year since my last post, which I cannot believe it has been that long! I would like to thank everyone that has messaged me to check up on me and who have kept me in their prayers, it has meant the world to me! For those who might not know, sadly the health issues I've dealt with over the years rapidly got worse along with new health problems arising on top of that, I unfortunately had to abruptly take time away from crafting in order to focus on my health. Currently things are being managed as best as possible so I am able to get back to doing what I love, crafting and card making :) I have just started to work on some projects so as I get them completed I will share them with you all. I hope you all will please stay tuned to my blog so we can get to crafting together again ;) Talk to you all soon!
Sunday, July 10, 2016
60 Days of Diemond Dies - July Project
Hello everyone! I am here today to share my July project for the 60 Days of Diemond Dies! In case you didn't see my last post, let me share with you what it is. 60 Days of Diemond Dies it where Guest Design Team Members along with the current DT Members will be sharing projects they've made using Diemond Dies products over a 60 day period. Dee the owner of Diemond Dies will also be giving away some amazing prizes! If you would like a chance to win, and of course after you have viewed my project, hop on over to Diemond Dies Facebook page
where you will need to "Like" their page and then comment on the
projects featured during the 60 Days of Diemond Dies.
Dee was so sweet to send me some Diemond Dies products to use on my projects, but her graciousness didn't stop there, as she also gave me two discount offers! The first is a discount code for 10% off your purchases at the Diemond Dies store plus free shipping if you spend $35 or more on products (this is for both US and International orders)! Just use the code thankscharity for that offer. If you spend less than $35 on products use the code save10 to still get 10% off your product order however you will not receive free shipping when you spend less than $35 on products. Aren't these discount offers fantastic! When you are ready to go shopping at the Diemond Dies Store just click here.
Be sure to save or write down the 10% discount & free shipping code on product purchases of $35 or more which is thankscharity OR the 10% discount code on product purchases less than $35 which is save10 so you will have it ready when shopping. (I will be putting all the direct links down below to Diemond Dies Facebook page, Diemond Dies store, and Diemond Dies YouTube Channel so you can just click on them to be directly taken there)
Now let me share my project so that you all can head on over to Diemond Dies :) For my card I used the small Diemond Dies Monarch Butterfly Small set. As always I will list all the products I used on my card down below. If you would like to hear more details about my card as well as see the Diemond Dies products I used you can click here to view the video I made on my YouTube channel :)
Thank you all so much for stopping by today!

Diemond Dies clickable direct links:
Diemond Dies Facebook page
Diemond Dies store
Diemond Dies YouTube Channel
10% discount & free shipping code for product purchases $35 or more - thankscharity
10% discount code for product purchases less than $35 - save10
Supplies List:
Diemond Dies - Monarch Butterfly Small Die Set (*DTMB)
GeorgiaPacific White Cardstock
Stampin Up Cardstock - Crisp Cantaloupe
Stampin Up Dye Ink Pad - Crisp Cantaloupe
My Creative Time - StitchedRectangular Frame Dies & More
My Creative Time - More Stitched Rectangular Dies
Multi Matte Medium.5oz
Scor-Pal/Scor-Tape/SookwangTape
Crafter's Companion - Extra Strong Permanent Tape Runner
EK SuccessPrecision Tip Tweezers
AmericanCrafts/Cut Up 9" Paper Trimmer
Martha Stewart - Scoring Board Tool
Crafter's Companion - Extra Strong Permanent Tape Runner
EK SuccessPrecision Tip Tweezers
AmericanCrafts/Cut Up 9" Paper Trimmer
Martha Stewart - Scoring Board Tool
Sizzix Big Shot Machine
SizzixMagnetic Platform
SizzixMagnetic Platform
(Disclaimer: Any supply links listed above are
links solely being used as a guide to show you what those items are. Some links
may come directly from the manufacturer while others may not. Unless otherwise
stated all products were purchased by me with my own money and in no way am I
affiliated with these links nor the businesses associated with them, meaning I
receive no compensation for sharing these products with you. I simply share
these products because I personally enjoy using them and think you might too.
Products provided to me as part of my Design Team Member benefits will be
marked with a *DTMB. Please use your discretion should you choose to shop from
the links listed above. Thank you.)
Sunday, June 26, 2016
Diemond Dies Summer YouTube Hop
Happy Sunday Everyone! I wanted to let you all know that Diemond Dies is having a Summer YouTube Hop! There are so many wonderful projects for you to see as well as amazing prizes that you could win! There is also a no minimum purchase 15% off discount code plus free shipping both in the US and International! To get this fantastic offer just use code hop15 when purchasing from the Diemond Dies Online Store (this discount offer and code are only valid from today June 26, 2016 until July 10, 2016) (This is the link to the Diemond Dies Online Store www.diemonddies.com)
The prizes up for grabs during the Diemond Dies Summer YouTube Hop are one $50 gift certificate and three $10 gift certificates! Aren't those terrific prizes!! For all the details on how you could win just click here to watch this video from Diemond Dies. The deadline to enter is July 10, 2016. (Here is the link to the video if for some reason my link doesn't work https://www.youtube.com/watch?v=b5_j55qfh3c)
I will be one of the Guest Design Team Members sharing the project I made for the Diemond Dies Summer YouTube Hop so below is a peek into what I made :) I hope you will come join in on the fun over at Diemond Dies YouTube channel! Have a blessed day!

If you like the digital image I used for my project you can purchase it from here: Sherri Baldy My Besties Steampunk Sisters
Monday, June 13, 2016
60 Days of Diemond Dies - Creation #1
Hello everyone! I am here today to share my first project for the 60 Days of Diemond Dies! In case you didn't see my last post, let me tell you what it is. 60 Days of Diemond Dies is where Guest Design Team Members along with the current DT Members will be sharing projects they've made using Diemond Dies products throughout the months of June, July, and a couple days in August. Dee the owner of Diemond Dies will also be giving away some amazing prizes! If you would like a chance to win, and after you have viewed my project, hop on over to Diemond Dies Facebook page where you will need to "Like" their page and then comment on the projects featured during the 60 Days of Diemond Dies. Easy peasy, right!
Dee was super kind and sent me some products to use on my projects, but her graciousness didn't stop there, as she also gave me two discount offers! The first is a discount code for 10% off your purchases at the Diemond Dies store plus free shipping if you spend $35 or more on products (this is for both US and International orders)! Just use the code thankscharity for that offer. If you spend less than $35 on products use the code save10 to still get 10% off however your shipping will not be free. Isn't that awesome that you get two codes and chances to win prizes! Woo Hoo! So when you are ready to go shopping at the Diemond Dies Store just click here.
Be sure to save or write down the 10% discount & free shipping code on product purchases of $35 or more which is thankscharity OR the 10% discount code for product purchases less than $35 which is save10, this way you will have the codes all ready when shopping. (I will be putting all the direct links down below to Diemond Dies Facebook page, Diemond Dies store, and Diemond Dies YouTube Channel so you can just click on them to be directly taken there)
Well, I better get on with sharing my project so that you all can head on over to Diemond Dies :) For my card I used all the products that Dee sent me because I just loved them all so much that I couldn't decide which to use first so I used them all, lol! As always I will list all the products I used on my card down below. If you would like to hear more details about my card as well as see the Diemond Dies products I used you can click here to view the video I made on my YouTube channel :)
Thank you all so much for stopping by today! It really does mean a lot that you all took the time, because I know we all have things going on in our daily lives that keep us pretty busy, so I really do appreciate you all!
Diemond Dies clickable direct links:
Diemond Dies Facebook page
Diemond Dies store
Diemond Dies YouTube Channel
10% discount & free shipping code for product purchases $35 or more - thankscharity
10% discount code for product purchases less than $35 - save10
Supply List:
Diemond Dies - Cherry Blossom Branch & Flower Die Set (*DTMB)
Diemond Dies - Picket Fence Die (*DTMB)
Diemond Dies - Grass Border Die (*DTMB)
Diemond Dies - Monarch Butterfly Small Die Set (*DTMB)
Diemond Dies - Cross Stitched Squares
Recollections Cardstock - Soda
Recollections Cardstock - Blue Ombre
Lawn Fawn 6 x 6 Paper Pack - Perfectly Plaid
Georgia Pacific White Cardstock
Dee was super kind and sent me some products to use on my projects, but her graciousness didn't stop there, as she also gave me two discount offers! The first is a discount code for 10% off your purchases at the Diemond Dies store plus free shipping if you spend $35 or more on products (this is for both US and International orders)! Just use the code thankscharity for that offer. If you spend less than $35 on products use the code save10 to still get 10% off however your shipping will not be free. Isn't that awesome that you get two codes and chances to win prizes! Woo Hoo! So when you are ready to go shopping at the Diemond Dies Store just click here.
Be sure to save or write down the 10% discount & free shipping code on product purchases of $35 or more which is thankscharity OR the 10% discount code for product purchases less than $35 which is save10, this way you will have the codes all ready when shopping. (I will be putting all the direct links down below to Diemond Dies Facebook page, Diemond Dies store, and Diemond Dies YouTube Channel so you can just click on them to be directly taken there)
Well, I better get on with sharing my project so that you all can head on over to Diemond Dies :) For my card I used all the products that Dee sent me because I just loved them all so much that I couldn't decide which to use first so I used them all, lol! As always I will list all the products I used on my card down below. If you would like to hear more details about my card as well as see the Diemond Dies products I used you can click here to view the video I made on my YouTube channel :)
Thank you all so much for stopping by today! It really does mean a lot that you all took the time, because I know we all have things going on in our daily lives that keep us pretty busy, so I really do appreciate you all!
 |
| Front of card measures 6" x 6" |
Diemond Dies clickable direct links:
Diemond Dies Facebook page
Diemond Dies store
Diemond Dies YouTube Channel
10% discount & free shipping code for product purchases $35 or more - thankscharity
10% discount code for product purchases less than $35 - save10
Supply List:
Diemond Dies - Cherry Blossom Branch & Flower Die Set (*DTMB)
Diemond Dies - Picket Fence Die (*DTMB)
Diemond Dies - Grass Border Die (*DTMB)
Diemond Dies - Monarch Butterfly Small Die Set (*DTMB)
Diemond Dies - Cross Stitched Squares
Recollections Cardstock - Soda
Recollections Cardstock - Blue Ombre
Lawn Fawn 6 x 6 Paper Pack - Perfectly Plaid
Georgia Pacific White Cardstock
Stampin' Up Dye Ink Pad - Tempting Turquoise
My Favorite Things Dye Ink Pad - Spearmint
Lime Green Adhesive Bling Jewels
Ranger Mini Round Ink Blending Tool Foam Refills
Scor-Pal/Scor-Tape/Sookwang Tape
Crafter's Companion - Extra Strong Permanent Tape Runner
Scor-Pal/Scor-Tape/Sookwang Tape
Crafter's Companion - Extra Strong Permanent Tape Runner
EK Success
Precision Tip Tweezers
American
Crafts/Cut Up 9" Paper Trimmer
Matha Stewart - Scoring Board Tool
Foldio 2 Portable Photo Studio
Sizzix Big Shot Machine
Sizzix Magnetic Platform
Clear Plate Holder (to hold my card - can be found at Michael's Crafts)
The Stamps of Life - Custom Made Personalized Stamp (used to stamp very back of card)
Challenges Entered:
Simon Says Stamp - Monday Challenge World Traveler (I thought this would be perfect for traveling to Washington, DC to see the cherry blossoms)
Word Art Wednesday - Challenge #234 & #235 Anything Goes
(Disclaimer: Any supply links listed above are
links solely being used as a guide to show you what those items are. Some links
may come directly from the manufacturer while others may not. Unless otherwise
stated all products were purchased by me with my own money and in no way am I
affiliated with these links nor the businesses associated with them, meaning I
receive no compensation for sharing these products with you. I simply share
these products because I personally enjoy using them and think you might too.
Products provided to me as part of my Design Team Member benefits will be
marked with a *DTMB. Please use your discretion should you choose to shop from
the links listed above. Thank you.)
Sunday, June 5, 2016
60 Days of Diemond Dies!
Happy Sunday to everyone! Just wanted to pop in and let you know that today marks the start for the 60 Days Of Diemond Dies event! Woo Hoo! I was so blessed to be given a Guest Design Team spot by the owner Dee! I will be featuring my projects on June 13th and July 11th so be sure to check back to see them! There are many other fantastic creations being featured as well so for the complete line up visit the Diemond Dies Facebook page: https://www.facebook.com/Diemond-Dies-405160769595096/ To see all the fantastic products Diemond Dies has to offer visit www.diemonddies.com and when shopping use code thankscharity to save 10% & get free shipping on purchases of $35 or more (both USA and International purchases)! I hope you will join us over the next 60 days to see all the wonderful products we use on our creations!
Tuesday, March 29, 2016
Coffee, Coffee, Coffee!
Howdy all! I am here today to share a card I made using a super cute digi image from Craftin Desert Divas called Coffee Cup Mouse. I absolutely love coffee so when I saw this my mind started going crazy with all the things I wanted to do and stamp sets I wanted to combine, sadly I couldn't do everything that I wanted or else this card would have been one hot mess, lol! However, I ended up pairing it with some of my most favorite Craftin Desert Divas stamp sets called Thankful Squeaks and Lovies. I of course had to jazz my card up with some sparkly goodness so I used Wink of Stella on my coffee cup and the eyes of that adorable mouse as well as inside on the sentiment. I was also super blessed to receive the new Rose Gold Embossing Powder from Simon Says Stamp which went perfectly with the colors on my card so I used that to emboss the sentiment seen on the front of the card.
That pretty much wraps up my card but before I finish up I wanted to remind you about all the fun things happening at Craftin Desert Divas during the month of April. Starting April 1st Craftin Desert Divas will be starting a new Monthly Digi Challenge. The theme will is "Welcome Spring", so we would love to have you join us, and by doing so you could have the chance to win a $10 code to use in the CDD Shop! Anytime during the month of April just click here to be taken to the CDD Facebook Gallery where you can find out further details and upload your entry. You can also find the weekly free digital stamp over at the CDD Shop in which you could use for the challenge as long as it fits the theme. Isn't that awesome! Craftin Desert Diva's will be having their "Linky Parties" as well, which you can find all that information in the CDD Facebook Gallery too. Then starting on April 4th they will be starting Sneak Peeks of the April Release which you can click here for all the Release details. Wow, I know that's a lot but it's going to be so much fun so I hope you will join us! Thank you so much for stopping by my blog today, it means the world to me that you took the time! I wish you a wonderful day!
Supplies List:
Craftin Desert Divas - Coffee Cup Mouse Digi Image (*DTMB)
Craftin Desert Divas - Thankful Squeaks Stamp Set
Craftin Desert Divas - Lovies Stamp Set
My Creative Time - Stitched Rectangular Frame Dies & More
My Favorite Things - Open Simply Scallops Trio
Spectrum Noir Alcohol Markers - EB1, EB2, EB5, GB8, GB10, CG1, DG3
Recollections Cardstock - Neutral
That pretty much wraps up my card but before I finish up I wanted to remind you about all the fun things happening at Craftin Desert Divas during the month of April. Starting April 1st Craftin Desert Divas will be starting a new Monthly Digi Challenge. The theme will is "Welcome Spring", so we would love to have you join us, and by doing so you could have the chance to win a $10 code to use in the CDD Shop! Anytime during the month of April just click here to be taken to the CDD Facebook Gallery where you can find out further details and upload your entry. You can also find the weekly free digital stamp over at the CDD Shop in which you could use for the challenge as long as it fits the theme. Isn't that awesome! Craftin Desert Diva's will be having their "Linky Parties" as well, which you can find all that information in the CDD Facebook Gallery too. Then starting on April 4th they will be starting Sneak Peeks of the April Release which you can click here for all the Release details. Wow, I know that's a lot but it's going to be so much fun so I hope you will join us! Thank you so much for stopping by my blog today, it means the world to me that you took the time! I wish you a wonderful day!
 |
| Front of Card - A2 Side Fold measuring 5.50" H x 4.25" L |
 |
| Card Inside |
 | ||
| Card Back - You know I love to decorate the back too. Isn't this stamp super duper cute! |
Supplies List:
Craftin Desert Divas - Coffee Cup Mouse Digi Image (*DTMB)
Craftin Desert Divas - Thankful Squeaks Stamp Set
Craftin Desert Divas - Lovies Stamp Set
My Creative Time - Stitched Rectangular Frame Dies & More
My Favorite Things - Open Simply Scallops Trio
Spectrum Noir Alcohol Markers - EB1, EB2, EB5, GB8, GB10, CG1, DG3
Recollections Cardstock - Neutral
Stampin' Up Ink Pad - Crumb Cake
Stampin' Up Ink Pad - Soft Suede
Stampin' Up Ink Pad - Baked Brown Sugar
Simon Says Stamp - Rose Gold Fine Detail Embossing Powder (generously given to me by Simon Says Stamp)
Homemade White Enamel Dots
White Jelly Roll Pen (to add white highlights/detail)
Black Jelly Roll Pen (to add black detail)
Wink of Stella - Clear
Copic Multiliner Pens (to add black detail in areas where alcohol markers are used)
Scor-Pal/Scor-Tape/Sookwang
Tape
Crafter's Companion - Extra Strong Permanent Tape Runner
Crafter's Companion - Extra Strong Permanent Tape Runner
Scrapbook
Adhesives - Thin
White 3D Foam Squares Mix
Scrapbook
Adhesives - Thin
Black 3D Foam Squares Mix
American
Crafts/Cut Up 9" Paper Trimmer
Matha Stewart - Scoring Board Tool
Foldio 2 Portable Photo Studio
Sizzix Big Shot Machine
Sizzix Magnetic Platform
Clear Plate Holder (to hold my card - can be found at Michael's Crafts)
The Stamps of Life - Custom Made Personalized Stamp (used to stamp very back of card)
Matha Stewart - Scoring Board Tool
Foldio 2 Portable Photo Studio
Sizzix Big Shot Machine
Sizzix Magnetic Platform
Clear Plate Holder (to hold my card - can be found at Michael's Crafts)
The Stamps of Life - Custom Made Personalized Stamp (used to stamp very back of card)
Subscribe to:
Posts (Atom)